Introduction to Deploying Solutions on top of SharePoint 2010
This introduction does not talk about how to deploy SharePoint itself but rather
solutions on top of SharePoint that leverages the platform. For SharePoint deployment
check out the technet docs on it.
In most cases there is four ways to deploy functionality and configuration to a
SharePoint platform
| Browser | Apply settings and perfom administrative taskt through the web ui of Central Admin and site settings. |
| stsadm | Stsadm is a command line tool that lives in C:\Program Files\Common Files\Microsoft |
| Shared\Web Server Extensions\14\bin\Stsadm perfomes administrative operations of a wide spectrum. | |
| Powershell | Starting with the 2010 release of SharePoint PowerShell is supported as an out of the box administrative and automation tasks. |
| Code | Almost everything that can be done by the options listed above can be done through code and wise versa. |
Scenario
Let’s start out with a scenario. The developer has created some SharePoint
artifacts in Visual Studio 2010 using the SharePoint tooling. All deployment has
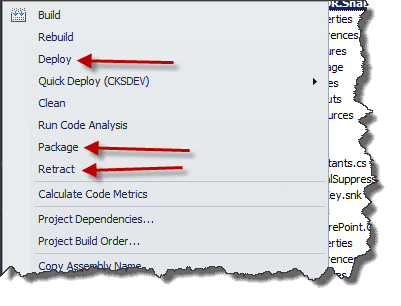
been local through Visual Studio’s menu options or just by using F5.
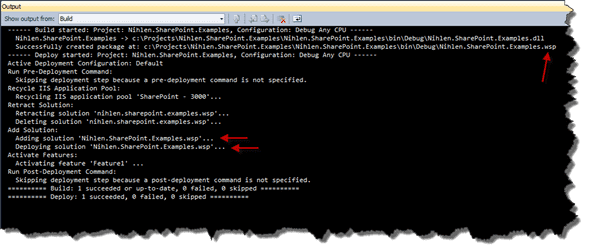
To get a feeling of what has to be done every deployment we can have a look at Visual Studios default configuration.

Now it’s time to deploy to another box, like the Consolidated Development
Environment.
Packaging
Every time you deploy with Visual Studio a Windows SharePoint Package (called WSP’s) is created and deployed.
The same package is used for deployment to other boxes to. You find the package in the projects bin directory in the folder corresponding to your build configuration.
The WSP package contains the stuff from the Visual Studio. Examples are:
- Dlls – for GAC or \bin deployment
- Safe controls entries for web.config – will keep track of these types of changes
- SharePoint specific folders – deploys stuff to the 14-hive to folders like
Layouts, Images, …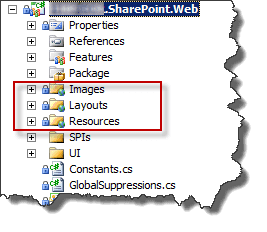
To gain a greater understanding of what is deployed through the wsp packages you can have a look at the manifest file for the package. Look in pkg folder in the file system and navigate down to manifest.xml.
<?xml version="1.0" encoding="utf-8"?>
	<Solution xmlns="http://schemas.microsoft.com/sharepoint/" SolutionId="321c78d2-61cc-4a3c-9551-2a0cf3f83a3f" SharePointProductVersion="14.0">
		<Assemblies>
			<Assembly Location="Nihlen.SharePoint.Web.dll" DeploymentTarget="GlobalAssemblyCache" />
		<Assemblies>
		<TemplateFiles>
			<TemplateFile Location="Images\Nihlen\additional_arrow.png" />
			<TemplateFile Location="Images\Nihlen\arrow_down.png" />
			<TemplateFile Location="Images\Nihlen\arrow_down_active.png" />
			<TemplateFile Location="Images\Nihlen\button_buy.png" />
			<TemplateFile Location="Images\Nihlen\button_search.gif" />
			<TemplateFile Location="Layouts\Nihlen\CSS\base.css" />
			<TemplateFile Location="Layouts\Nihlen\CSS\Coromant.css" />
			<TemplateFile Location="Layouts\Nihlen\CSS\demo.css" />
			<TemplateFile Location="Layouts\Nihlen\CSS\reset.css" />
			<TemplateFile Location="Layouts\Nihlen\CSS\style.css" />
			<TemplateFile Location="Layouts\Nihlen\ErrorPage.aspx" />
		<TemplateFiles>
		<FeatureManifests>
			<FeatureManifest Location="Nihlen.SharePoint.Web_PageArtifacts\Feature.xml" />
 			<FeatureManifest Location="Nihlen.SharePoint.Web_RootWebTemplate\Feature.xml" />
			<FeatureManifest Location="Nihlen.SharePoint.Web_Web\Feature.xml" />
		<FeatureManifests>
	</Solution>
</xml>
So first thing you need to is to gather the WSP’s and copy them up to a server in the SharePoint farm. The don’t need to be distributed to all machines in the farm, this is handled by the wsp deployment framework within SharePoint. I usually use the box running Central Admin for this task, no real reason really – just habit.
You can gather up the WSP’s manually or do as I do an use a simple PowerShell script for this task. It’s dead simple:
$trgPath = Read-Host " Enter target path"
get-childitem C:\Projects\Nihlen\Main\Source -Recurse -Include *.wsp | foreach-object -process{copy-item $_.FullName -destination $trgPath}
When you got the WSP-files up on the server, use remote desktop to connect to the server.
Add Solution (wsp)
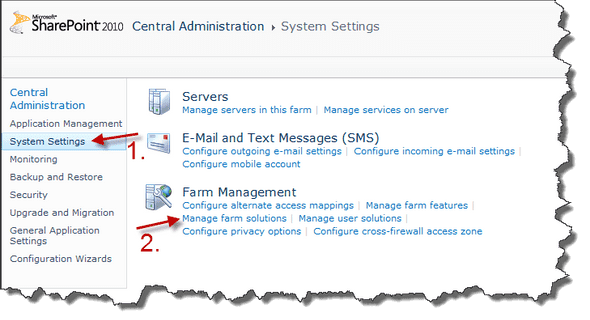
First time out, you need to add the solution to SharePoint and make it aware that the package exists. To see what solution packages are added to your farm, crack open Central Administration and navigate to System Settings and then Manage Farm Solutions under Farm Management.
If your dealing with a clean environment there is a text there explaining that there are no solutions deployed, but if there are some solutions deployed, they will show up there in a list with some info about them.
Web UI
There is no way to add a solution using the web user interface.
stsadm Stsadm is the “old” way of doing this, but it’s still fully supported. Here’s how you do it.
stsadm -o addsolution -filename [-lcid]
So for example:
stsadm –o addsolution –filename Nihlen.SharePoint.Web.wsp
PowerShell Using PowerShell for deployment is pretty straight forward. First of all you need to load up the commandlets for SharePoint. This can be done in two ways. The first option is to simply run the SharePoint Management Console form the start menu and they are loaded for you right off the bat.

If you’re running an ordinary PowerShell prompt or script you have to add it yourself.
Add-PSSnapin Microsoft.SharePoint.Powershell
When you’ve taken one of the approaches described above you can get cracking on adding the solution to the farm. This is done with the Add-SPSolution commandlet. Example:
Add-SPSolution E:\Deploy\2010-10-01_01\Nihlen.SharePoint.Web.wsp
There is of course a few other parameter to play with if you like: http://technet.microsoft.com/en-us/library/ff607552.aspx
Code
Using code this can be done by using the SPSolutionCollection on the SPFarm object.
SPFarm.Local.Solutions.Add(“E:\Deploy\2010-10-01_01\Nihlen.SharePoint.Web.wsp”);
That said, this approach is very seldom used.
Installing Solution (wsp)
Now when you solution(s) are added to the farms solution store you can install them. This also can be done in a couple of different ways.
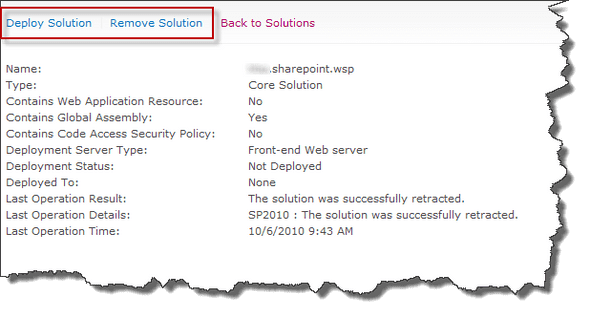
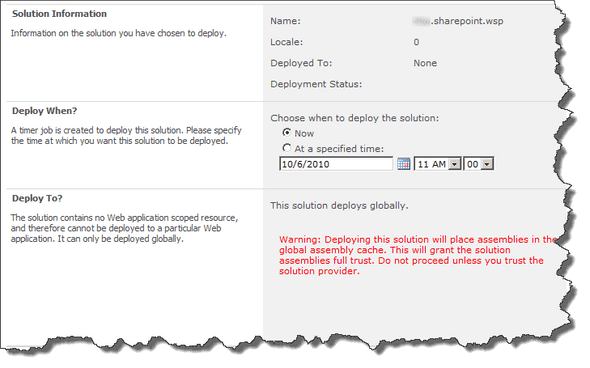
Web UI When the solutions is added to the solution store it can be accessed via Central Administration (System Settings –> Manage Farm Solutions. You can click on the package name and get deployment options.
Stsadm
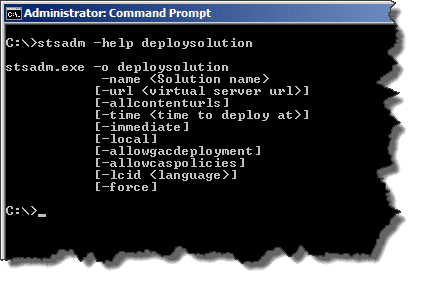
stsadm –o deploysolution has a few parameters to play with.
Many of these parameters depends on how the features within the solution is scoped. In the example below there are only farm scoped features, hence no use of the –url or –allcontenturls parameters. So a simple example could be:
stsadm -o deploysolution -name Nihlen.sharepoint.wsp -immediate –allowgacdeployment
PowerShell The equivalent in PowerShell is the Install-SPCommandlet. So to do the same thing as
Install-SPSolution ”Nihlen.SharePoint.wsp” –GACDeployment
Activating Features Next step in the deployment process is to activate features. There is a lot of logic that ends up encapsulated in SharePoint Features. One example is custom web.config changes.
Visual Studio 2010 defaults to auto activating of features.
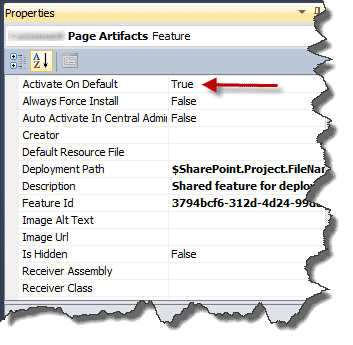
This is all god for development purposes but for deployment to other environments (UAC, Prod, …) I prefer a much more granular control over what what gets executed when. So my recommendation is to turn this off.
Let’s have a look at how we can activate features.
Web UI
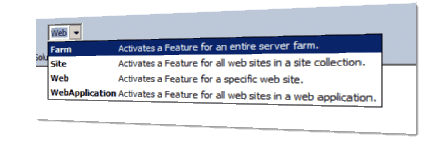
Where in the UI you activate features depends on how they are scoped.
Farm Activation is performed under Central Admin (System Settings –> Mange Farm Features) Web Application This is scoped for a Web Application and is activated/deactivated in Central Administration under Application Management –> Manage Web Applications, select a web application and chose Manage Features in the ribbon. Site Is Site Collection scoped. Point browser to your site. Enter Site Actions –> Site Settings and make sure you’re on the top level (otherwise click Go to top level site settings) and click on Site collection features Web Scoped to a single SharePoint web. Enter Site settings on that web and chose Manage site features (in the Site Actions section)
So, this is what it could look like this:
Stsadm
Activating a feature using stsadm is also dependent on the scope, but that just makes some of the parameter vary.
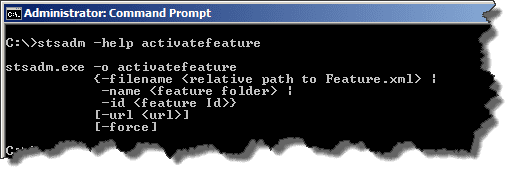
Example:
stsadm -o activatefeature -name Nihlen.SharePoint.Examples_Feature1 -url
PowerShell
PowerShell’s corresponding commandlet is Enable-SPFeature.
Enable-SPFeature -identity Nihlen.SharePoint.Examples_Feature1 -URL [ http://sp2010:3001](http://sp2010:3001)
Retraction
When deploying to test and UAC environments and deploying before the first go live version I usually recommend full retraction and re-deploying every time. Handling upgrades is a whole different ballgame by itself.
Summary
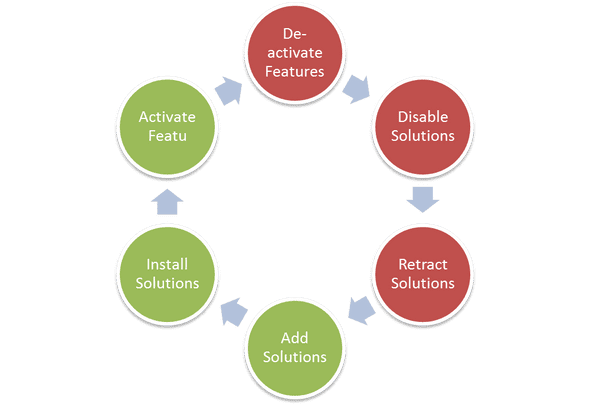
So to try to tie this post up. User PowerShell when possible. The steps are:
Here’s an sample PowerShell script doing it:
Add-PSSnapin Microsoft.SharePoint.Powershell -erroraction SilentlyContinue

function End {
	Write-Host "-- Finished step: " $args[0]  -ForegroundColor blue
}

function Begin {
	Write-Host "-- Beginning step: " $args[0]  -ForegroundColor blue
}

function WriteStatus {
	Write-Host "" $args[0]  -ForegroundColor green
}

cls

$deployUrl = Read-Host "Enter the web application url"
#$dropPath = Read-Host "Path to folder containing WSP files"

$p = Get-Item .\
$dropPath = $p.FullName

$task = "Uninstalling Solution Nihlen.SharePoint.Web.wsp"

Begin $task
Uninstall-SPSolution -Identity "Nihlen.SharePoint.Web.wsp" -Confirm:$false
End $task


$task = "Uninstalling Solution Nihlen.SharePoint.wsp"

Begin $task
Uninstall-SPSolution -Identity "Nihlen.SharePoint.wsp" -Confirm:$false
End $task

Read-Host "Verify in Central Admin that packages are uninstalled/retracted and then hit enter"

$task = "Remove Solution Nihlen.SharePoint.Web.wsp"

Begin $task
Remove-SPSolution -Identity "Nihlen.SharePoint.Web.wsp" -Force -Confirm:$false
End $task

$task = "Remove Solution Nihlen.SharePoint.wsp"

Begin $task
Remove-SPSolution -Identity "Nihlen.SharePoint.wsp" -Force -Confirm:$false
End $task

Read-Host "Verify remove ok, and hit enter to restart IIS"

$task = "Restarting IIS"
Begin $task
Write-Host "Not running at the moment"
#Restart-Service W3SVC,WAS -force
#Start-Service W3SVC,WAS
End $task

$task = "Adding wsp Nihlen SharePoint Core"
$fileName = $dropPath + "\Nihlen.SharePoint.wsp"

Begin $task
Add-SPSolution $fileName
End $taks

$fileName = $dropPath +  "\Nihlen.SharePoint.Web.wsp"
$task = "Adding wsp Coromant Web: " + $fileName

Begin $task
Add-SPSolution $fileName
End $taks

$task = "Installing wsp Nihlen SharePoint Core"

Begin $task
Install-SPSolution "Nihlen.SharePoint.wsp" -GACDeployment #-AllWebApplications   #-WebApplication $deployUrl -GACDeployment
End $taks

$task = "Installing wsp Coromant Web"
Begin $task
Install-SPSolution "Nihlen.SharePoint.Web.wsp" -GACDeployment #-WebApplication $deployUrl
End $taks

Read-Host " Veriry that packages are installed/deployed in Central Admin and hit enter for feature activation"

Enable-SPFeature -url $url -identity WebTeplatesFeature
This script is a first draft so don’t see it as something final.
//Niklas
Tags: SharePoint
