Quantified House - Raspberry Pi and 1-wire
What
Becoming a house owner I felt a need to mix in some nerdyness with all the home renovation. Lately I’ve getting in to the Raspberry Pi and when a friend at work told me about the 1wire components that could be connected using USB and no soldering I was hooked.
This post describes how I got it up and running to log temperature at two places and humidity at one.
This is my first stab at this so the scripts are in a first version just to get it up and running with a lot of redundant and unpolished code. Also, this is the first time since switching over to wordpress I’m trying to use github gists for code. If it looks wonky – please let me know.
OS
I started out with the latest drop of Raspian Weezy from http://www.raspberrypi.org/downloads and used win32DiskImager to get the image on to the SD card. Plopped it into the Pi and was off to the races.
I used ssh to execute stuff on the Pi, it was enabled by default in my Raspberry. I looked in my routers admin ui to get the IP-address. I used Putty as
Network
Next up was getting the WiFi working. I borrowed a wifi usb dongle from my brother: Wireless USB 11N Nano Adaptor 802.11N (WiFi Dongle). Which I plugged in one of the USB ports.
Then I cracked opened the /etc/network/interfaces which looked like:
| auto lo | |
| iface lo inet loopback | |
| iface eth0 inet dhcp | |
| allow-hotplug wlan0 | |
| iface wlan0 inet manual | |
| wpa-roam /etc/wpa_supplicant/wpa_supplicant.conf | |
| iface default inet dhcp |
and changed it to this:
| auto lo | |
| iface lo inet loopback | |
| iface eth0 inet dhcp | |
| allow-hotplug wlan0 | |
| auto wlan0 | |
| iface wlan0 inet dhcp | |
| wpa-ssid network-name | |
| wpa-psk password | |
| #wpa-roam /etc/wpa_supplicant/wpa_supplicant.conf | |
| #iface default inet dhcp |
After a reboot the wifi was up and running. To verify that the Pi got an ip-number I used the ifconfig command.
Now I put the raspberry up on the attic and connected the sensors.
The sensors
So, my weapon of choice here is to use 1wire components. I’ve bought a little board with humidity and temperature on that I connected to the Raspberry Pi using USB. Here is the components (the links are to a web shop in Swedish):
| Component | Link |
| Humidity sensor | [https://www.m.nu/luftfuktighetsmatare-version-2-p-373.html](https://www.m.nu/luftfuktighetsmatare-version-2-p-373.html "https://www.m.nu/luftfuktighetsmatare-version-2-p-373.html") |
| Temperature sensor | [https://www.m.nu/temperatursensor-pa-kabel-p-44.html](https://www.m.nu/temperatursensor-pa-kabel-p-44.html "https://www.m.nu/temperatursensor-pa-kabel-p-44.html") |
| 1wire USB | [https://www.m.nu/adapter-usb-1wire-ds9490r-p-49.html](https://www.m.nu/adapter-usb-1wire-ds9490r-p-49.html "https://www.m.nu/adapter-usb-1wire-ds9490r-p-49.html") |
OWFS
To get some readings from the sensors I needed to set up One-Wire File Systems called OWFS. This is where I thought my years in windows-land only would bring my experiments to a grinding halt.
But lo and behold, thanks to this awesome tutorial (also in Swedish) I managed to trickle through some very unixy make commands.
After doing this I could get values from the sensors using the cat command
cat /mnt/1wire/26.0ECE3B010000/humidity gives me 54.6871% Relative Humidity (%RH). Which by the way is a value I’m very satisfied with.
Executing logic
My weapon of choice is Ruby, mostly because I’ve played with it and like it and I don’t know any python and mostly wanna forget C and C++. To get it running I first had to install a bunch of stuff.
Install stuff
Proftpd ftp server to be able to transfer files with ease.
sudo apt-get install proftpd
Next up was ruby.
sudo apt-get install ruby
In order to be abele to install native extensions such as the json gem I needed to install ruby 1.9.1.-dev, I don’t understand why but then again I’m not a Linux guy.
sudo apt-get install ruby1.9.1-dev
When I was done with that it looked like this:
After that I went ahead and installed some gems I know my ruby scripts needs.
sudo gem install awesome_print
sudo apt-get install libxslt-dev libxml2-dev
sudo gem install nokogiri
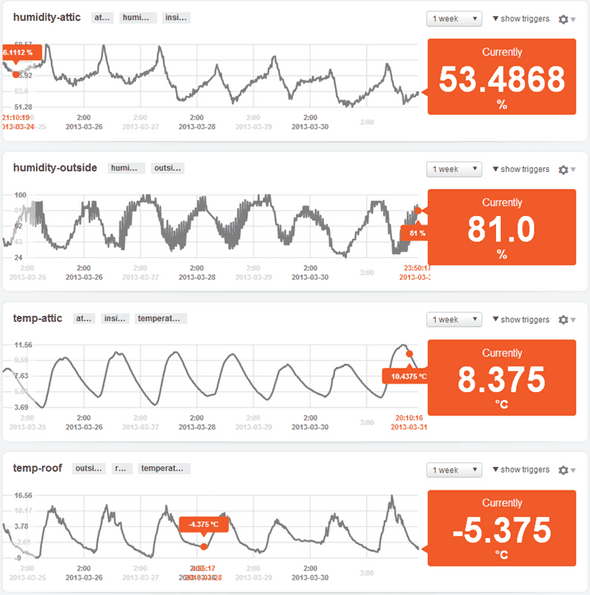
For logging I’m currently trying out both Cosm (used to be Pachube) and TempoDB, so I’m logging to both. Therefore I need to install both client libraries:
> sudo gem install cosm-rb
> sudo gem install tempodb
The Code
First up, logging to cosm
| require 'cosm-rb' | |
| require 'json' | |
| require 'ap' | |
| def get_path_for_family path, directory_path | |
| family = File.open(File.join(path, directory_path, 'family')).gets.strip.to_i | |
| if family == 28 | |
| File.join(path, directory_path, 'temperature') | |
| elsif family == 26 | |
| File.join(path, directory_path, 'humidity') | |
| else | |
| nil | |
| end | |
| end | |
| def get_cosm_dataseries_key entry | |
| if entry == '28.1061D6020000' | |
| 'temp-roof' | |
| elsif entry == '28.10521C040000' | |
| 'temp-attic' | |
| elsif entry == '26.0ECE3B010000' | |
| 'humidity-attic' | |
| else | |
| nil | |
| end | |
| end | |
| # TODO: Check if args exist | |
| path = ARGV[0] | |
| Dir.entries(path).each do |entry| | |
| if entry.match(/^[0-9]/) | |
| unless get_path_for_family(path, entry).nil? | |
| ap entry + ' - ' + get_path_for_family(path, entry) | |
| value = File.open( get_path_for_family(path, entry) ).gets.strip.to_f | |
| series_key = get_cosm_dataseries_key(entry) | |
| datapoint = Cosm::Datapoint.new(:at => Time.now , :value => value) | |
| ap datapoint | |
| Cosm::Client.post('/v2/feeds/100109/datastreams/' + series_key + '/datapoints', | |
| :headers => {"X-ApiKey" => '<api-key>'}, | |
| :body => {:datapoints => [datapoint]}.to_json) | |
| end | |
| end | |
| end |
And next up logging to TempoDB:
| require 'tempodb' | |
| def get_path_for_family path, directory_path | |
| family = File.open(File.join(path, directory_path, 'family')).gets.strip.to_i | |
| if family == 28 | |
| File.join(path, directory_path, 'temperature') | |
| elsif family == 26 | |
| File.join(path, directory_path, 'humidity') | |
| else | |
| nil | |
| end | |
| end | |
| def get_tempodb_series_key entry | |
| if entry == '28.1061D6020000' | |
| 'temperature-outside-roof' | |
| elsif entry == '28.10521C040000' | |
| 'temperature-attic' | |
| elsif entry == '26.0ECE3B010000' | |
| 'humidity-attic' | |
| else | |
| nil | |
| end | |
| end | |
| # TODO: Check if args exist | |
| path = ARGV[0] | |
| tempodb_client = TempoDB::Client.new('xxxxxxx', 'xxxxxxxxx') | |
| Dir.entries(path).each do |entry| | |
| if entry.match(/^[0-9]/) | |
| unless get_path_for_family(path, entry).nil? | |
| value = File.open( get_path_for_family(path, entry) ).gets.strip.to_f | |
| series_key = get_tempodb_series_key(entry) | |
| data = [TempoDB::DataPoint.new(Time.now, value)] | |
| tempodb_client.write_key(series_key, data) | |
| end | |
| end | |
| end |
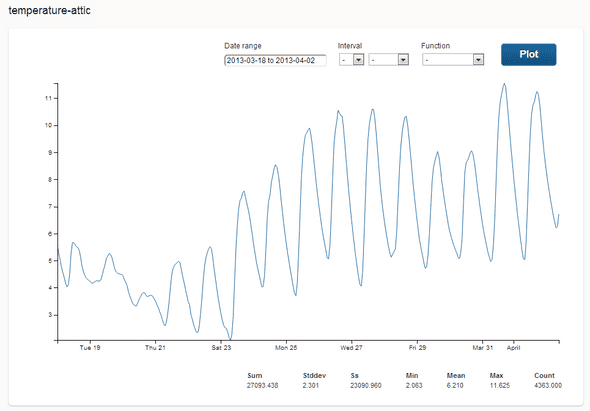
One drawback for me is that TempoDB only lets you query one series at the time.
Tags: Raspberry Pi, Ruby


